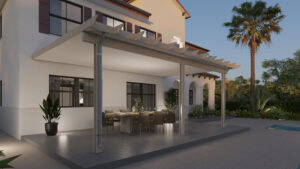
If you enjoy spending time outdoors but need better protection from Florida’s sun and rain, an aluminum patio cover kit can be one of the smartest upgrades for your home.
A patio cover creates a shaded outdoor area where you can relax, dine, entertain, grill, or protect furniture from daily weather exposure. Instead of letting your patio sit unused during the hottest parts of the day, the right aluminum roof system can turn it into a more comfortable and practical extension of your home.
At Alumcenter LLC, we specialize in supplying DIY aluminum patio cover kits and insulated roof systems throughout Florida. Our goal is to help homeowners, contractors, and installers plan durable outdoor roof systems with the right materials, layout, and support for each project.
What Is an Aluminum Patio Cover Kit?
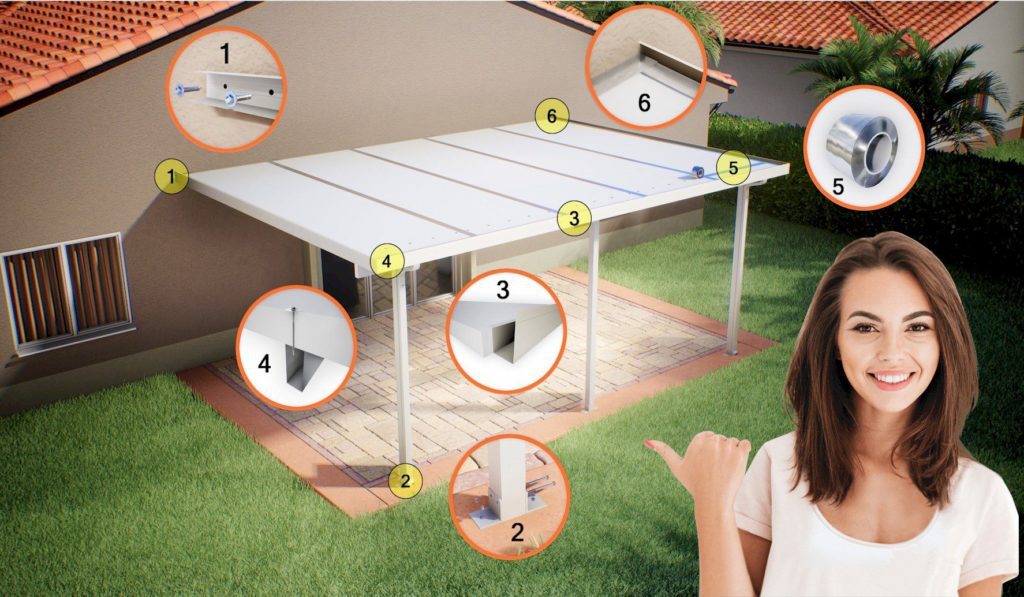
An aluminum patio cover kit is a complete material package used to build a covered patio roof. Instead of sourcing each part separately, a kit includes the main components needed for the structure.
Depending on the project, a patio cover kit may include:
- Insulated aluminum roof panels
- Aluminum beams
- Aluminum posts
- Fascia
- E-gutter
- Downspouts
- Wall attachment materials
- Fasteners and hardware
- Sealant or related installation materials
- Fan beams, when included in the design
The exact kit depends on the roof size, projection, attachment type, post height, panel thickness, frame color, and delivery location.
Why Aluminum Is a Smart Choice in Florida
Florida weather is tough on outdoor structures. Constant sun, humidity, rain, wind, and insects can quickly wear down materials that are not built for long-term outdoor use.
Aluminum is a strong option because it is durable, low maintenance, and resistant to many of the problems that affect wood and fabric shade systems.
Unlike wood, aluminum does not rot, warp, or attract termites. Unlike fabric covers, it does not need to be removed during storms or replaced after sun exposure damages the material.
For Florida homeowners, that matters.
Benefits of Aluminum Patio Cover Kits
Strong Shade and Rain Protection
A solid aluminum patio cover provides real shade and better rain protection than a pergola, canopy, or lattice cover. This makes the space more usable for outdoor furniture, grills, dining areas, and everyday backyard living.
Low Maintenance
Aluminum patio covers require much less maintenance than wood structures. You do not need to stain, seal, or repaint them regularly. Basic cleaning, gutter maintenance, and occasional inspections are usually enough.
Clean, Modern Appearance
Aluminum patio covers create a clean and finished look. With frame color options such as white or bronze, plus different post, beam, gutter, and fascia configurations, the structure can be designed to complement many Florida homes.
Better Outdoor Living Space
A covered patio gives you more usable space without building a full room addition. It can become an outdoor dining area, backyard lounge, shaded poolside space, outdoor kitchen cover, or carport.
Cost Control With DIY Kits
A DIY patio cover kit can help reduce project cost because you are purchasing the material package separately from the installation labor. Some homeowners install the kit themselves, while others hire a local installer or contractor.
This gives customers more flexibility and more control over the total project budget.
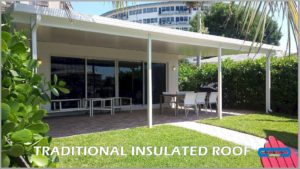
Insulated Aluminum Roof Panels
Many Alumcenter patio cover kits use insulated aluminum roof panels. These panels are made with aluminum skins and an insulated foam core, creating a strong roof system with a clean finished ceiling appearance.
The insulated core helps reduce heat transfer, which can make the space underneath more comfortable than a basic non-insulated metal roof.
Common panel thickness options include:
- 3-inch panels for smaller or shorter-span covers
- 4-inch panels for added strength and insulation
- 6-inch panels for larger spans or stronger structural needs
The right thickness depends on the project size, roof projection, span, wind requirements, and support layout.
Do not choose panel thickness only by price. The correct panel must fit the structure.
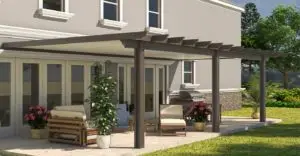
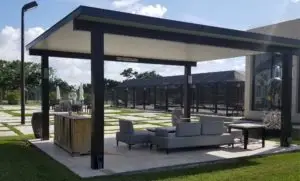
Attached vs. Freestanding Patio Covers
One important decision is whether the patio cover will be attached to the home or freestanding.
An attached patio cover connects to the home, usually at the wall or fascia. This is common for backyard patios, outdoor kitchens, and covered seating areas.
A freestanding patio cover uses its own posts and beams without relying on the home for support. This may be useful for poolside spaces, detached patios, mobile homes, or situations where attaching to the house is not ideal.
The right choice depends on the home’s structure, layout, and local requirements.
What to Consider Before Ordering a Kit
Before requesting a quote, you should be clear on the basic project details.
Important information includes:
- Roof length
- Roof projection
- Attachment type
- Desired post height
- Frame color preference
- Panel thickness preference, if known
- Complete delivery address
- Photos of the installation area
- Sketch or layout with measurements
Photos are especially important. They help show the wall, fascia, slab, pavers, gutters, windows, doors, roofline, and any obstacles that may affect the patio cover design.
Florida Code, Permits, and Engineering
This is where many homeowners underestimate the project.
A patio cover is not just decorative. In Florida, outdoor roof structures may be affected by wind requirements, footing details, attachment methods, product approvals, and local permitting rules.
Some projects may require a permit, engineering, or signed and sealed drawings. Even if components have Florida Product Approval, the final project may still need site-specific engineering depending on the property and local building department.
This is why proper planning matters before installation begins.
Can You Install a Patio Cover Kit Yourself?
A DIY patio cover kit can be installed by a capable homeowner or installer, but it still requires careful planning, proper tools, and safe handling of long panels and structural components.
DIY may make sense if:
- You have construction experience
- You have the right tools
- You have help available
- The project is simple and manageable
- You understand the installation requirements
Hiring an installer may be better if:
- The roof is large
- The structure is freestanding
- Footings are required
- The project needs a permit
- You are not comfortable with structural work
- You want the project completed faster
A smart middle ground is to purchase the kit from Alumcenter LLC and hire a qualified local installer to assemble it.
Aluminum vs. Other Patio Cover Options
| Option | Best For | Main Limitation |
|---|---|---|
| Fabric canopy | Temporary shade | Limited durability |
| Wood patio cover | Traditional appearance | High maintenance, rot, termites |
| Vinyl cover | Lower upfront cost | Less durable over time |
| Aluminum pergola | Style and partial shade | Limited rain protection |
| Insulated aluminum patio cover | Shade, rain protection, low maintenance | Higher upfront cost than basic shade |
| Louvered roof | Premium adjustable shade | Higher cost and more complexity |
For many Florida homeowners, an insulated aluminum patio cover kit offers the best balance of durability, comfort, low maintenance, and long-term usability.
Ways to Make Your Covered Patio More Useful
A patio cover is only the beginning. Once the space is shaded and protected, you can improve it with:
- Outdoor dining furniture
- Lounge seating
- Ceiling fans
- Lighting
- Outdoor kitchen layout
- Screen wall options
- Pavers or finished flooring
- Planters and privacy features
- Gutters and downspouts
- Storage benches or built-in seating
The key is to plan these features early. It is much easier to include fan beams, layout adjustments, and drainage planning before the kit is ordered.
Use the 3D Patio Cover Designer
The easiest way to start planning is with Alumcenter LLC’s 3D Patio Cover Designer.
You can enter your dimensions, review layout options, and start visualizing your patio cover before requesting a quote. This gives our team a better starting point and helps reduce confusion during the quoting process.
Instead of guessing, you can begin with a clear design direction.
Final Thoughts
An aluminum patio cover kit can help transform an exposed patio into a shaded, comfortable, and more useful outdoor living space.
For Florida homeowners, aluminum is a strong choice because it offers durability, low maintenance, clean design, and better long-term performance than many wood, fabric, or vinyl options.
A DIY patio cover kit can also help reduce costs while giving homeowners more control over the project. But the structure still needs proper measurements, correct materials, safe installation, and attention to local requirements.
Alumcenter LLC supplies DIY aluminum patio cover kits throughout Florida and helps homeowners, contractors, and installers plan outdoor roof systems with the right materials for the project.
To get started, use our 3D Patio Cover Designer or contact Alumcenter LLC at (954) 674-2631.